Showing posts with label baby room. Show all posts

Tuesday, September 20, 2011

Kids Room Clock!

This is a project that I have been working on for a few months... in my defense a lot has happened in our family during that time... it seemed like I would start this clock and then something would happen... 
So I am very glad that it is finally completed!

I picked up this clock at the Sally Ann back in the spring, knowing I wanted to do exactly this project!
Not so cute hey...

So I turned it into this!
(I thought that I had pictures of this progress but it seems that I just have the before and after... oops. I know I'm a bad bad craft blogger... oh well ha ha)
I started by painting it green it took about 3 coats to cover up that pink...
Then I took my "high tech" circle templates that I used in this project that I did for the kids room and repeated the pattern I used in that project just a little more scattered...

I added the numbers using my "pencil-picture transfer method" that I use frequently like here (in the Winnie the pooh paintings) and here (on the motorcycle coasters). 
Basically I printed off some numbers I liked, rubbed the back of the paper with a pencil, placed the number on the clock and traced on to the clock. Then you can paint the number or just fill it in with Sharpie like I did which saves a bit of time and can be more precise if you don't have a steady hand...

So my clock turned out GREAT (if you ask me) and Delaney loves it! What I love is it is a brand new clock for $3 and I am able to say "Hey I did that!"!

Have you made over anything fun lately? Do you make the decor for your kids room? I'd love to hear all about it in the comments!

Wednesday, August 31, 2011

Initial for Max!

I love initial's I think they are such a great way to decorate they are super trendy but they are also a little personal as well. I also love that there are so many things you can do with them, dress them up for a living room, go natural for a mud room or a porch, or make them fun and whimsical for a child's room. There are so many things that you can make them into as well, book ends, hair clip holders, hat hooks, and so much more!

 So with this passion for initials I wanted to make something for Max with his initial on it, and I had made one similar for Delaney a few years ago to hold her hair bows (you know the ones with the ribbon hanging down from the bottom of the letter) so I thought I'd come up with an idea for our boy as well. 


I just painted the letter M red and then I sewed a few pockets and hems in the Cars fabric. 
(which is showing up yet again) Then I just hot glued the fabric to the letter and hung it on the wall! 

I got the fabric on clearance and I got the initial at Walmart for $1 making this project super easy and super affordable. I love it for his side of the room because it's masculine and cute, I think it could make a great gift too!

Do you have a passion for initials? What have you done with them lately?? I'd love to hear all about them! or better yet see them! Leave a link in the comments I'd love to see what other creative things can be done!

Wednesday, July 6, 2011

Nursery Paintings 2...

Yesterday I  showed you my owl paintings, I did them as a part of the art work that I am doing for Baby Max's side of the room he will share with Delaney. (hopefully not for long...) As I mentioned a few times before I wanted to go with colors like oranges, blues and greens... and not just owls but bubbles as well... 
So while thinking up what exactly I would make/paint/craft.... This popped into my head...


Ive seen the bubbles patterns painted directly on the walls of other babies nursery's but I didn't want to go that far.. 
So I just picked up these little canvases at the dollarama and got to it... 
Here is how I made my "Bubble Art"

 I stared by turning them upside down ...
Then I used painters tape to keep them together while I painted.
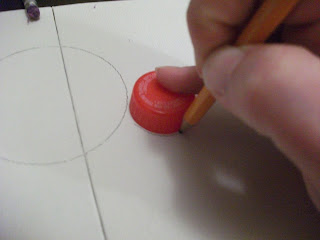
 then I took several different size circle items...
 and traced around them with a pencil on the canvas.
 I just added and added until I felt there were enough, I over lapped some and just erased the line between them so that it was easier to paint and the lines weren't hard to cover up...
 then I started to paint them scattering the colors a bit so that there weren't two blue bubbles right next to each other or that the bubbles that were all the same size weren't the same color.
I left the tape on the back until it dried and then peeled it back and it was done... I plan to hang it more like the picture below...
Pretty simple but executed the pattern I wanted perfectly!

Do you have bold colors and patterns in your children's bedrooms? Do you children share rooms? How did you decorate for both of them...

Tuesday, July 5, 2011

Nursery Paintings 1

In the last few weeks I have been trying to finish up a few things for the kiddos room, I have started a few things for Delaney's side but they aren't finished just yet so I thought I would show you one of the sets of paintings that I did for Max's side... This is one of two "sets" (the second you can see tomorrow...) As I showed you here, I wanted to do something owl and bubble related for Max's side of the room in oranges, greens and blues.


I painted this one a week or two ago...
and then while doing the ones you will see tomorrow I was looking it over and over and felt like it wasn't enough....


So I elaborated on it and came out with this... 

I love the owls and I think they came out so cute! 
Here is a close up...


I think my favorite one is the little green and blue one in the bottom of the last one.... 
One more thing done for the Baby's room! YAY!

Do you make art work for your kids rooms? Do you have a theme in your kids rooms? I'd love to hear about them or better see them!!! 

Saturday, June 18, 2011

Inspiration for the Kiddos room!

As I have mentioned before Delaney and Baby Max (whose arrival may seem far away to some, much closer to me as I get bigger and bigger and less able to walk the length of myself without 1. having to pee and 2. stop to catch my breath....) will be sharing a room for as long as we are living in this apartment. 
As I very well know he will not be spending lots of his time in there but, I still want to redecorate the room which is now purple so that its not an obvious GIRLS room when he gets here. 

I mentioned here that I am planning to paint the room green (we finally picked the perfect green  "New Grass" by CIL and picked it up today) and that Max's side will be accented with Blues and oranges, and Delaney's side with Pinks and Purples! 

Well here is a better idea for you of my "vision..." Whether it looks like the photos below or not when complete I can not guarantee but here is what I see in my head... 


I am in love with the owls and the circle/bubble themes available right now and I think that this "Retro" owl from WallFry is the perfect combo of the colors I love and the owl and circle theme I am liking for Max's side of the room.

Photo and art credit: http://wallfry.blogspot.com/
 
This one is a close up of a canvas for sale on etsy its actually very big and is a picture of three trees, but I am thinking I just like the bubble look up close.
 
Photo and art credit: http://www.etsy.com/listing/52173614/modern-orange-aqua-poofy-flowers-fabric
 
And this was just too cute not to add plus this was the song that we used as the processional song at our wedding... well "All you need is love" but I think this is such a cute idea!

photo and art credit: http://thecolorbee.blogspot.com/2011/04/owl-you-need-is-love.html
 
I plan on incorporating these ideas in the art work I make myself because as we all know I like to do things myself!
However the other side, Delaney's side may look a little more like this as she is a bit obsessed with a certain girl who is berry sweet....
Photo from and item available at: http://strawberry-shortcake.allaboardtoys.com/strawberry-shortcake-live-to-dance-pillowcase.html

Photo from and item available at: http://www.roommatespeelandstick.com/walldecals/strawberry-shortcake-wall-stickers.aspx?affid=cj

However in all honesty I will likely be just putting up the art work that my sister made for her as well as her butterfly 3d art (my sister made these too and I will be posting about them very soon!) and maybe a Strawberry Shortcake picture or two... 

So there you have it bubbles and owls in orange and blue opposite Strawberry Shortcake in purple and pink. 
I only hope that it turns out as cute as it is in my head and not completely opposite and disjointed as it looks here on the blog....

Tuesday, May 31, 2011

First "nursery" Project!

So I am trying to get a few new things together for the "Nursery/Shared Room" for the kiddos! 

And when I saw this a few weeks ago I thought holy that's cute!

These are from dollarstorecrafts.com
I love Dollar Store Crafts.... cause well I love the dollar store!

So after I thought holy that's cute I thought I wonder what I could do with this.... and then this came out...


I am in love with them!

Here is how I did them... 
(unfortunately I was so excited while making them that I forgot to take pictures...)

First I cut down a cardboard box... shocking for me I know... 
I cut it to the size that I wanted (I cut four of them) and then I glued two of the sheets together with just white glue and I weighted them down with plates and vases... 
Next I painted them both white. 
Then I lightly sketched out each name and glued my crayons down over the sketched letters.
Personally I preferred to have them with the outside paper taken off and I cut them much smaller of course since I had more letters to make. 

Here is a close up of the letters....

For Max's I did all the letters in green, yellow, orange and blue... the colors I am using for his side of the room.


and for Delaney I used reds, purples and pinks. (the colors of one Strawberry Shortcake)
Then I used excess cardboard to make the frames, I did my best to make them a perfect mitered edge but clearly I didn't succeed, and at 9:30 after a long day with a very active girl I really didn't mind that it wasn't perfect. Then I just covered the cardboard with scrapbooking paper in coordinating colors... reddish for Delaney and orangeish for Max.

Here they are again... in full and a bit closer up!


I think they will look great against the green walls... Yup I am painting the walls green and I can't wait!

Make anything cute for your kids lately? 
I'd love to hear about it!

Saturday, May 28, 2011

Delaney's Nursery!

Since I am planning a room re-do for Delaney and Baby Max (who will share a room for as long as we are living in our current apartment) I thought that I would show off what I did for Delaney's Nursery a few years back.... 
(boy does that make me sad... she was a baby 3 years ago!)
We were living in another apartment at that time and couldn't paint so I jazzed up the room a few other ways! 
(I am so glad we can paint this time around because right now the room is purple... yup girly all the way in there!)
Please excuse the poor photography...

I went kind of gender neutral last time around even though I knew I was having a girl because my mom had me terrified that the ultrasound tech was wrong and that I might be bringing a boy home to a girls room....  
I went for the Winnie the Pooh theme and made almost everything myself!


First up I bought these letters on Clearance in a set but I didn't want to cover them with just any old paper so I used Winnie The Pooh Paper... I just glued it right on to the letters and then used ribbon to make a hanger on the back... You can also see her lamp right there as well you can see it in more detail below....

I painted the top and bottom rim of the shade with green paint (just plain old acrylic craft paint) and then drew the characters on with a black fine tip marker. 

Then I sewed her laundry hamper I took an old fabric hamper that was ripped and took it apart with a seam ripper to use it for a pattern then I cut out my Winnie The Pooh fabric and my Yellow and sewed it up... 


These paintings I did on small canvases I bought at the Dollarama! (I love that place!) I did these by choosing my pictures (mine came from a coloring book but you could certainly print them from your home printer) then I took an ordinary pencil and rubbed the outline of picture on the back of the paper, then I taped the picture to the canvas (right side out) so it wouldn't move and traced the picture from the front onto the canvas. I took a fine tip sharpie and went over the pencil lines and then it was like a paint by numbers... I just painted my picture as I wanted it colored... (My one recommendation is make sure your picture isn't too detailed or it will be hard to get good lines with your pencil/sharpie)


I made this small Winnie The Pooh Pillow pretty much the same way as I did the paintings except I did it on fabric... and because it was yellow fabric I just painted his shirt, hat and honey pot... but because its is done with sharpie and regular acrylic paint it isn't washable and is completely decorative only! 
I also made her curtains... I just made simple panels by sewing a hem along the bottom and along the top as well.
Hope that this gives you some inspiration if your planning a gender neutral room or a Winnie The Pooh room... 
All of these ideas of course could be adapted to any theme and I plan on using some of them in the new room too...

Happy Saturday to you!